Ruth J Jamieson Art

Ruth J Jamieson created artwork and designs in a variety of themes influenced by interests in nature, spirit, science and fantasy.

This content shows Simple View

March 2016

Making Headway

The garage was up

and ready for cladding. With one exception, the garage door header.

We had chosen to put in a double wide door instead of the two single doors that were specified in the original plans. That meant we needed to put a header across the 16 foot wide opening to support the weight of the roof. I made the header of two pieces of 2 x 12 lumber about 17 feet long and with ½” spacers between.

That meant the header was an awkward to handle 170 lbs or about 120 lbs more than I should lift by myself.
Unfortunately I was by myself.
I could lift it a few inches off the ground.
Unfortunately it needed to sit 7 feet above the floor.

I had had the presence of mind to construct the header right in front of the door opening so I didn’t have to drag it too far to get it in place.
Since I could only lift it a short distance I figured I could raise it in steps.
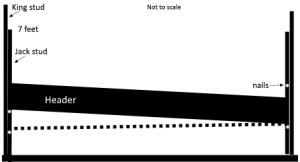
header lift
header lift – not to scale

I drove a 3 ½” nail part way into the frame of the garage and lifted one end of the header on top of the nail.
Next I drove a nail a few inches higher on the other side of the door opening and raised the header to rest on the nail. Because the wood had been cut to fit on top of the Jack studs which were between the King studs, I could only angle the header up a small amount before it would not reach the nail so I continued lifting each side a few inches each time.

Progress

It was slow going but it was progress.
It wasn’t scary until I realized that I had a very loosely held 170 lb block of wood nearly 7 feet off the ground.
It did occur to me that being hit by this falling header might void my warranty.

Remember: This is NOT a How To blog. It is a how we did it blog. Take precautions, get help and if you don’t know how to do it, find out first.

Once the header was up on the Jack studs I nailed it in place and breathed a sigh of relief.

After that workout, putting the cladding on would be a breeze or so I thought.

After seeing my technical drawings some people ask me if I am an artist. To these people I say yes and offer prints at a reasonable price. Normal people can buy art here…


EARTH TEXTURE Genuine Fractal Tshirt
EARTH TEXTURE Genuine Fractal Tshirt by dequilla
See other Merchbooth T-Shirts at zazzle

  • Categories:

Framing the Garage

Back to Work

After a bit of a rest I got back to work.

I had the garage package, a hammer, saw and a large box of 3 ½ inch spiral nails. Why spiral nails and not common nails you ask?
I don’t do common.
Just kidding. Spiral nails hold better than the common nails and when you are building a house you think of things like that. Kind of like the old joke: I’d like some 2×4’s. How long? A long time, I’m building a house.

I laid out one wall, flat on the garage floor (well as flat as the floor would allow), just as the plans specified. I measured and marked the header and footer (the stick on the top and the bottom) and started nailing the studs in place. Two nails top and bottom.
It was beautiful.
It was 24 feet long.
It was too heavy and ungainly for me to lift.

Not only was it too heavy for me to lift, I also did not have a drill (or electricity) to drill the holes in the footer plate to go over the bolts in the concrete (yes I said concrete again) (this is a “how we did it” not a step by step how to).

More Manpower

This required more manpower. And a drill.

As for the “How to” part, you need to plan where to put the bolts or anchors in the concrete. To do that you need to know where the studs and doors will be and not put the bolts there. That’s where the blueprints or plans come in.
We ended up moving the location of the door so I had to cut a bolt out in that location, but, if there is one constant in construction, it is change.

The other thing that was required was a sill gasket. This is a strip of plastic-y foam that separates the wooden footer from the concrete, thereby preventing moisture from rotting the bottom of your wall which would be a bad thing.

1980’s

The next day I returned with my family and a hand drill. I did not think a cordless drill would hold a charge long enough to drill all the holes I needed. This was the end of the 1980’s. After using the hand drill I wish I had tried a cordless one.

Ruth and our son Matt and I were able to lift the first section of wall and brace it. We then proceeded to frame in the other three walls before calling it a day. It may have been a few days. I always think I work faster than the reality of it.

The Takeaways

Buy a cordless drill and extra batteries.

Wait until the internet is in common use and Google is invented and Google how to stuff.

Wait until cell phones are in common use so you can call for help.

If you want a unique April Fool’s gift for your significant other, or just a pet tag…

Pet tag
Pet tag by ladybuglane
Check out Dogs Pet Tags online at zazzle

  • Categories:


top